|
I used WANem or netem a couple of times in the past, but sometimes I ran it on a full blown PC/server and that wasn't so portable... In 2015 I thought it would be cool to run it on a tiny Raspberry Pi (2) and after some googleing I came across disk91.com where a nice guy already did exactly this. I read through the guide, but to fit my requirements I had to make some changes as I wanted it to be transparent (for example). Here is what I did and my result... The stuff you will need: - Raspberry Pi 1 B, 1 B+ or 2 B - RPi case (maybe) - RPi power supply - (micro)SD Card (depending on your RPi model) with at least 1 gig - ideally two USB network adapters, one would also work - minibian If you don't have the parts, you can get all of them on Amazon. Here is what I bought: - Raspberry Pi 2 Model B Project Board - 1GB RAM - 900 MHz Quad-Core CPU - Raspberry Pi 2 or B+ Case (Black), New Version - Improved fit for Pi 2! - Raspberry Pi B+ Power Supply (5v 2A) - USA - Samsung 32GB EVO Class 10 Micro SDHC up to 48MB/s with Adapter - Lenovo ThinkPad USB 3.0 Ethernet Adapter 4X90E51405 Disclaimer: Use on your own risk!! Don't use this guide if you don't know what you are doing. I can't be held responsible for deleted files/data or network downtime on your side!!!!! What you need to do: I will make this rather quick (and dirty), so I'm not going to show how to download and write minibian to your SD card etc (and be aware that that will wipe your SD card) as you can google that easily ;-) I'm listing here the steps I did. You can do it a different way or maybe even say that I shouldn't do something that way, but this is just a short guide showing ONE WAY how to do it! When booting minibian for the first time, the RPi will try to get an IP address via DHCP. If successful, you can login by SSH to the leased IP (see the leased addresses on your DHCP server). If you don't have a DHCP server or whatever, you can connect a monitor and keyboard and configure it locally, of course. minibian's default login credentials are root with password raspberry (you should change that of course). The first command I ran was apt-get update, followed by apt-get install raspi-config. This is the lazy way to resize the partition ;-) Just run raspi-config and resize your partition, as minibian uses just 512 MB by default and you will run into a full disk after installing the first few packages! Select Expand filesystem and Finish - your RPi will reboot. After the reboot, you can check if your partition has been resized by running df -h and fdisk -l. As we have more space available now we are going to upgrade our system and install some more packages: apt-get dist-upgrade apt-get install sudo apt-get install bridge-utils apt-get install lighttpd Now we got everything installed that we need. Some more things we should so now: echo 'www-data ALL= NOPASSWD: /sbin/tc' >> /etc/sudoers ln -s /usr/lib/cgi-bin /var/www/ lighty-enable-mod cgi This allows lighttpd to sudo /sbin/tc, links our CGI dir and enables CGI (quick and dirty) Now we do another reboot as it is the laziest way to get everything running (especially the installed bridge stuff) and also restarts lighttpd (CGI). To be on the safe side, I prefer it to do one reboot too much than troubleshoot something that could be fixed in 5 seconds... Up and running again we have everything configured and installed. The next step is to configure /etc/network/interfaces Mine looks as follows: auto lo iface lo inet loopback auto eth0 iface eth0 inet dhcp auto br0 iface br0 inet static bridge_ports eth1 eth2 bridge_stp off address 10.127.254.1 broadcast 10.127.254.3 netmask 255.255.255.252 What does this mean? Loopback is clear. eth0 is the built in interface. I want this configured by DHCP, but you can assign a static IP as well, of course. br0 is our bridge that includes our two USB LAN adapters. If you only have one USB LAN adapter, you have to bridge between that and the onboard NIC and assign the management IP to the br0 interface. I just added a dummy IP to the bridge as I don't want the br0 to send DHCP requests and once I had problems with tc and no IP on the bridge. This might not be an issue anymore, but the IP won't harm anybody (unless I guessed your LAN IP or something *G* - please take care!). Use whatever you want. Now I do a halt, plug in both USB LAN adapters and power on the RPi again. Normally you should reach the RPi again via his management IP and the two USB LAN adapters should transparently bridge traffic already. Now we need to configure our webinterface to easily set our parameters. cd /var/www ls -al rm index.lighttpd.html (or rename it) vi index.html In your new index.html, enter the following code: <html> <head> <title>RPi WAN Emulation</title> </head> <!-- Initial idea by disk91.com with some modifications by uebi.net, like switched instead of routed and added the packet loss parameter. --> <body> <br> <font face="arial" size="5"><b>Parameters for RPi WAN emulation</b></font> <br><br> <font face="arial">To clear the settings, just submit with the below defaults. <br><br><br> <form name="setting" action="/cgi-bin/exectc" method="post"> Latency (ms): <input type="text" name="latency" value="0"><br> Jitter (ms): <input type="text" name="var" value="0"><br> Bandwidth (kbit/s): <input type="text" name="bw" value="100000"><br> Packet Loss (%): <input type="text" name="loss" value="0"><br> </font> <br> <input type="submit" value="Configure"> <input type="reset" value="Defaults"> </form> </font> </body> </html> This is our webinterface to enter the values. It should look like this: 
Now we also need a short bash script that forwards the submitted values and executes them. Create a file called exectc in /var/www/cgi-bin/ and enter the following: #!/bin/bash Don't forget to run the following to set the proper owner/group and that the script is executable: chown www-data:www-data /var/www/cgi-bin/exectc chmod 755 /var/www/cgi-bin/exectc This script executes our tc commands and feeds them with the values supplied via the webinterface. If everything was entered as intended, a message will be displayed in your browser (or an error message if you missed something ;-) The original script did a tc qdisc, but I remarked that and my output shows the entered values. If you prefer the other way, just remark my lines and unremark the last tc qdisc line. My output looks like this: 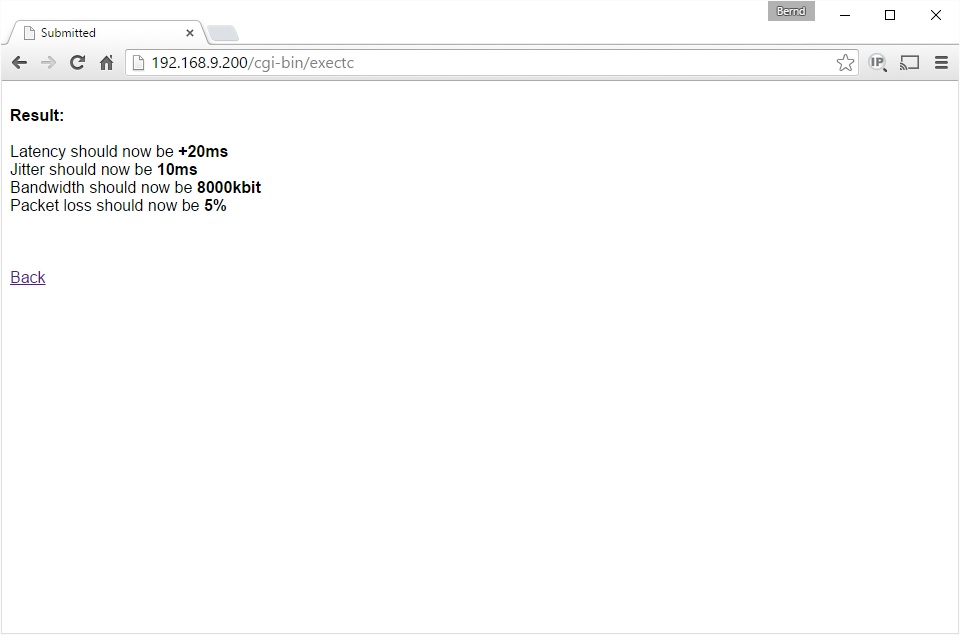
I hope this is helpful to somebody out there and feel free to improve it. Good luck and happy emulating :-) |